How to easily clone a (encrypted hard) disk over network (with dd and netcat)

The task was simple: two computers (notebooks). One - we call it A - with a working operating system (Xubuntu) and a new one - we call it B - without operating system. This is how I proceeded:

  1. Create bootable flash drive with in my case Arch-Linux
  2. In the Arch-Linux boot loader, press [TAB] and add "copytoram" to the boot command to load the squashfs image into ram. I needed this because in this case I only had a flash drive at hand. If you have two, you don't need this.
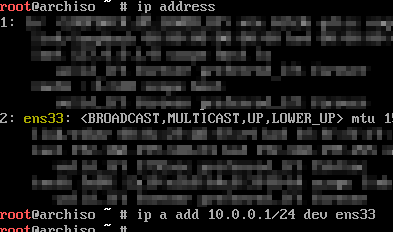
  3. List network devices:
    ip address
  4. Assign a IP adress to computer A with:
    ip address add <machine A ip adress> dev <ethernet device>

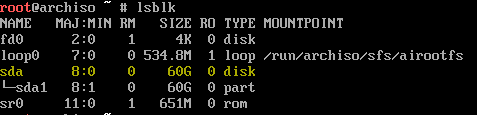
  5. To identify source disk, list all block devices with:
    lslbk

  6. Prepare the copy operation (do not execute yet!) with
    dd if=/dev/<source block device> bs=32M status=progress | nc <machine B ip adress> <random port number>

  7. Boot machine B from the same or different flash drive
  8. Assign different IP adress
  9. Identify target device
  10. Prepare the receiving copy operation with
    nc -l -p <same port number as A> | dd of=/dev/<destination block device> bs=32M status=progress

  11. Execute the command on Machine B
  12. Then execute the command on Machine A
  13. Wait until the copying process is completed.
  14. Use at least the Sync command to synchronize corresponding file data in volatile storage and permanent storage
  15. Restart the machine, you are done

How it works/remarks
dd reads the source drive bit by bit into the normal output stream. The output stream is piped to netcat, which sends it over the network to a receiving netcat process (server with -l). Therefore the server must be started first. The server receives the bits and piped them back to dd, which writes them to the target on machine B.

Maybe this is not the best and/or most efficient way, but transfer speed in my case of 75MB/s (poor performance on screenshots is from a setup with two vm's) is in IHMO very good for this simple setup.

Thanks to pmenke for his support.

SSO no longer works with VMware vSphere Client (SEC_ERROR_INADEQUATE_KEY_USAGE)

Last week I noticed that the Single Sign-On (SSO) for the vSphere Client (Flex and HTML5) no longer works in my Firefox. Normally, the VMware Enhanced Authentication Plugin toolbar disappears at the bottom and you can enable the "Using Windows Session Authentication" option, but the checkbox remains unchecked. Reinstalling the VMware Enhanced Authentication plugin, updating the vCenter Server and reinstalling the plugin does not work.

Then I open a ticket at Vmware Support. Hours and some technology later, we had no idea what was going on. But, we find out that the local web server at https://vmware-plugin:8094/ (used by the SSO) displays the following error message in Firefox:

SEC_ERROR_INADEQUATE_KEY_USE

It looks like a problem with the Enhanced Authentication Plugin certificate. This is provided by the plugin. It creates a local web server to communicate with the web page. The VMware support team then created the certificate manually, but the error still occurred - even with IE and Edge.

Then I tried it with a fresh portable Firefox and it worked. In my installed Firefox I removed certificate exceptions for the normal host from the vCenter and vmware-plugin. I also - and most importantly - remove the certificate from the vCenter host and the vmware plugin from the certification authorities in Firefox. Reload the page and it's working again.

How to Backup and Restore the VMware ESXi 6.x Configuration

Backup Configuration
  • Connect via SSH to your running ESXi Host
  • Run to backup config from host
    vim-cmd hostsvc/firmware/backup_config

  • Config saved under /scratch/downloads
  • Copy config to a safe location
Restore Configuration
  • Run enter maintenance mode
    vim-cmd hostsvc/maintenance_mode_enter
  • Run to restore config
    vim-cmd hostsvc/firmware/restore_config /tmp/configBundle.tgz

Restore Configuration on a blank machine
  • Install Host
    • Install the new host with the same ESXi Version and Build
    • Follow the installation assistent
    • Reboot machine
  • ISO
    • Create a ISO with your backuped configBundle.tgz
    • Burn ISO or Load ISO as Virtual Drive in your LOM
  • ESXi Shell
    • From the Direct Console User Interface, press F2 and Login to access the System Customization menu.
    • Click Troubleshooting Options.
    • Select Enable ESXi Shell and press Return to Enabled.
    • Press Alt+F1 to open the ESXi Shell
  • Mount CD-ROM
    • Load the iso9660 module with
      vmkload_mod iso9660

    • Find the Path to the CD-ROM with
      esxcfg-mpath -l | grep -i cd-rom

    • Set the loaded module to the CD-ROM
      vsish -e set /vmkModules/iso9660/mount <mpx.vmhba33:C0:T0:L0>
    • Now you can see the CD-ROM in the "ls /vmfs/volumes/"
  • Restore config
    • Copy config from mounted CD-ROM Drive to tmp
      cp /vmfs/volumes/<CDROM ISO9660 NAME>/CONFIGBU.TGZ /tmp/configBundle.tgz
    • Run to enter maintenance mode
      vim-cmd hostsvc/maintenance_mode_enter
    • Run to restore config
      vim-cmd hostsvc/firmware/restore_config /tmp/configBundle.tgz

[via]https://graspingtech.com/backup-vmware-esxi-6-5-configuration/[/via]
[via]https://www.techcrumble.net/2017/05/how-to-mount-the-host-cd-rom-to-the-esxi-shell/[/via]
[via]https://kb.vmware.com/s/article/2004746[/via]

PowerCLI error after vCenter Server upgrade

After upgrading to vSphere 6.7, a PowerCLI script aborts with this error message:

The vCenter Server is unable to decrypt passwords stored in the customization specification.

To resolve the issue, retype the password in the VMcustomization specifications (under Policies and Profiles). Edit the customization specifications and retype the password under the following two preference points:
- Administrator password
- Workgroup or domain

Remove VMware VIBs/VIB conflict

 ~ # esxcli software vib list | grep Mel
net-mst 2.0.0.0-1OEM.550.0.0.472560 Mellanox VMwareCertified [...]

~ # esxcli software vib remove -n net-mst
Removal Result
   Message: The update completed successfully, but the system needs to be rebooted for the changes to be effective.
   Reboot Required: true
   VIBs Installed:
   VIBs Removed: Mellanox_bootbank_net-mst_2.0.0.0-1OEM.550.0.0.472560
   VIBs Skipped:
~ #

Store VMware PowerCLI login credentials

Connect to VirtualCenter Server and enter credentials

Connect-VIServer -Server <Server>

Save the credentials to the credential store file (By default the credential store file is stored - encrypted - under the user profile directory)

New-VICredentialStoreItem  -Host <Server> -User "<Username>" -Password "<Password>"

[via]https://blogs.vmware.com/PowerCLI/2011/11/have-you-seen-powerclis-credential-store-feature.html[/via]