How to easily clone a (encrypted hard) disk over network (with dd and netcat)

The task was simple: two computers (notebooks). One - we call it A - with a working operating system (Xubuntu) and a new one - we call it B - without operating system. This is how I proceeded:

  1. Create bootable flash drive with in my case Arch-Linux
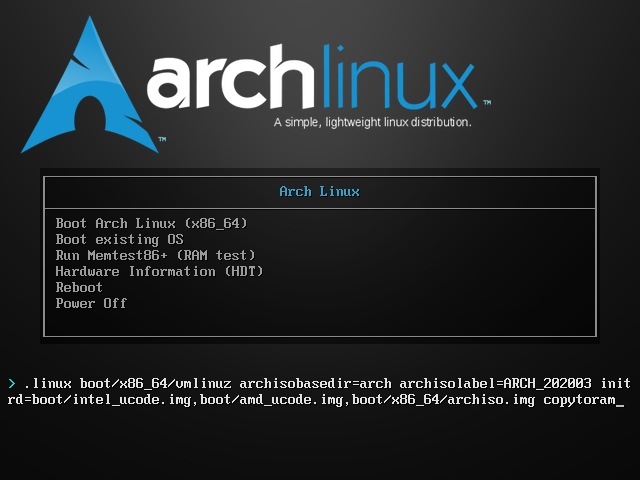
  2. In the Arch-Linux boot loader, press [TAB] and add "copytoram" to the boot command to load the squashfs image into ram. I needed this because in this case I only had a flash drive at hand. If you have two, you don't need this.
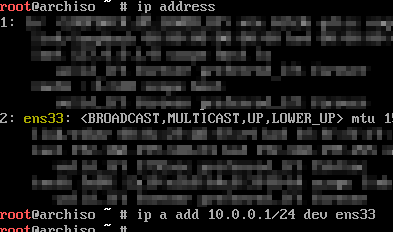
  3. List network devices:
    ip address
  4. Assign a IP adress to computer A with:
    ip address add <machine A ip adress> dev <ethernet device>

  5. To identify source disk, list all block devices with:
    lslbk

  6. Prepare the copy operation (do not execute yet!) with
    dd if=/dev/<source block device> bs=32M status=progress | nc <machine B ip adress> <random port number>

  7. Boot machine B from the same or different flash drive
  8. Assign different IP adress
  9. Identify target device
  10. Prepare the receiving copy operation with
    nc -l -p <same port number as A> | dd of=/dev/<destination block device> bs=32M status=progress

  11. Execute the command on Machine B
  12. Then execute the command on Machine A
  13. Wait until the copying process is completed.
  14. Use at least the Sync command to synchronize corresponding file data in volatile storage and permanent storage
  15. Restart the machine, you are done

How it works/remarks
dd reads the source drive bit by bit into the normal output stream. The output stream is piped to netcat, which sends it over the network to a receiving netcat process (server with -l). Therefore the server must be started first. The server receives the bits and piped them back to dd, which writes them to the target on machine B.

Maybe this is not the best and/or most efficient way, but transfer speed in my case of 75MB/s (poor performance on screenshots is from a setup with two vm's) is in IHMO very good for this simple setup.

Thanks to pmenke for his support.

IPsec VPN between Sophos UTM and AVM Fritz!Box (LTE) with a dynamic IP-Adresss

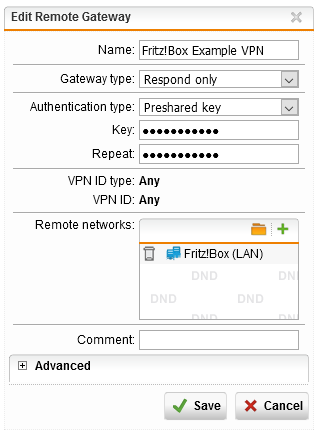
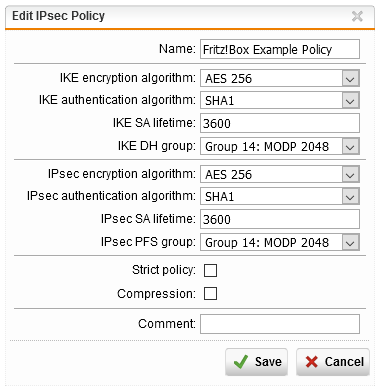
Use the following settings to configure a Fritz!Box - also a LTE version - to connect to a Sophos UTM (v9.7)

  • Sophos UTM Settings
  • Fritz!Box VPN VPN-Configfile
vpncfg {
        connections {
                enabled = yes;
                conn_type = conntype_lan;
                name = "Sophos IPsec";
                always_renew = yes;
                reject_not_encrypted = no;
                dont_filter_netbios = yes;
                localip = 0.0.0.0;
                local_virtualip = 0.0.0.0;
                remoteip = AAA.BBB.CCC.DDD; // Change to Sophos External IP
                remote_virtualip = 0.0.0.0;
                localid {
                        fqdn = "my.fqdn.net"; // No change needed. Is ignored from the UTN
                }
                remoteid {
                        ipaddr = "AAA.BBB.CCC.DDD"; // Change
                }
                mode = phase1_mode_idp; // Main Mode
                phase1ss = "dh14/aes/sha";
                keytype = connkeytype_pre_shared;
                key = "MySecr3tPassw0rd!"; // has to be changed
                cert_do_server_auth = no;
                use_nat_t = yes;
                use_xauth = no;
                use_cfgmode = no;
                phase2localid {
                        ipnet {
                                ipaddr = 192.168.0.1; // change to local network
                                mask = 255.255.255.0;   // change to local subnet
                        }
                }
                phase2remoteid {
                        ipnet {
                                ipaddr = 172.16.0.0; // change to remote network
                                mask = 255.255.255.0; // change to remote subnet
                        }
                }
                phase2ss = "esp-aes256-3des-sha/ah-no/comp-lzs-no/pfs";
                accesslist = "permit ip any 172.16.0.0 255.255.255.0"; // to remote network
        }
        ike_forward_rules = "udp 0.0.0.0:500 0.0.0.0:500",
                            "udp 0.0.0.0:4500 0.0.0.0:4500";
}


Could not find any disk on this device. PRTG error code: PE188

I got this error when I tried to add a SNMP HP ProLiant Physical Disk Sensor for HP Proliant DL 380 G7 with Windows 2012 R2 in our monitoring solution from Paessler (PRTG). The SNMP HP ProLiant System Health, Network and Storage Controller Sensor works fine.

HPE Insight Management Agents and HPE Insight Management WBEM Providers for Windows are installed.

An SNMP walk against OID 1.3.6.1.4.1.232.3.2.5 (used by Paessler for this sensor) works without errors but also without result.

I found some guys with the same probleme and a solution: The problem was the disk (controller) driver. Installed was v8.0.4.0, which seems to be a standard Microsoft driver. With the original HPE controller driver (for us 62.28.0.64) it works.


How to easily migrate a Synology EXT4 volume to Btrfs without data loss

Today I switched from a Synology DS215play to a DS918+. Perfect time to change the file system - the DS215play didn't support Btrfs. The migration also works with only one device. So I wrote down both ways.

Steps if you haven't changed your DiskStation

  • Backup your data! If you switch to a device with new drives like me, you still have a copy of your data, but if you migrate without new drives, you don't have a copy! In germany we say: No backup - no pity.
  • Shut down the DS, remove drive 2.
  • Format drive 2 with your computer.
  • Insert drive 2.
  • Turn the DS back on and DO NOT repair the fault volume.
  • Create a new volume (SHR and Btrfs) in the Storage Manager on drive 2.
  • For each shared folder, change the location to the new volume. You can only do this for one shared folder at a time and the move may need several hours depending on the size of your shared folders.
  • When you have moved all the shared folders, shut down your DS and remove drive 1.
  • Format drive 1 with your computer.
  • Turn on your DS and go to the Package Center. Repair all apps.
  • Expand your new volume to drive 1 and wait until RAID Resync is complete. You're done.

Steps if you are switching to a new DiskStation with new drives (my situation)

  • Turn off your old DS, remove drive 2.
  • In the new DS, place the new drives in slot 1 and 2. Place the (old) drive 2 in slot 3.
  • Turn on the new DS. Open your browser and navigate to the new DiskStation. In my case, the DS got a new IP address. I looked them up in my router DHCP table.
  • Follow the Migration Wizard and wait until the DS restarts.
  • Create a new volume (SHA and Btrfs) in the Storage Manager on drive 1 and 2. It is now recommended to change the RAID Resync speed to Fast and wait until RAID synchronization is complete.
  • Now for each shared folder, change the location to the new volume. You can only do this for one shared folder at a time and may need several hours depending on the size of your shared folders.
  • When you have moved all shared folders, shut down your DS and remove drive 3.
  • Turn on your DS and go to the Package Center. Repair all apps. You're Done.

SSO no longer works with VMware vSphere Client (SEC_ERROR_INADEQUATE_KEY_USAGE)

Last week I noticed that the Single Sign-On (SSO) for the vSphere Client (Flex and HTML5) no longer works in my Firefox. Normally, the VMware Enhanced Authentication Plugin toolbar disappears at the bottom and you can enable the "Using Windows Session Authentication" option, but the checkbox remains unchecked. Reinstalling the VMware Enhanced Authentication plugin, updating the vCenter Server and reinstalling the plugin does not work.

Then I open a ticket at Vmware Support. Hours and some technology later, we had no idea what was going on. But, we find out that the local web server at https://vmware-plugin:8094/ (used by the SSO) displays the following error message in Firefox:

SEC_ERROR_INADEQUATE_KEY_USE

It looks like a problem with the Enhanced Authentication Plugin certificate. This is provided by the plugin. It creates a local web server to communicate with the web page. The VMware support team then created the certificate manually, but the error still occurred - even with IE and Edge.

Then I tried it with a fresh portable Firefox and it worked. In my installed Firefox I removed certificate exceptions for the normal host from the vCenter and vmware-plugin. I also - and most importantly - remove the certificate from the vCenter host and the vmware plugin from the certification authorities in Firefox. Reload the page and it's working again.

How to Backup and Restore the VMware ESXi 6.x Configuration

Backup Configuration
  • Connect via SSH to your running ESXi Host
  • Run to backup config from host
    vim-cmd hostsvc/firmware/backup_config

  • Config saved under /scratch/downloads
  • Copy config to a safe location
Restore Configuration
  • Run enter maintenance mode
    vim-cmd hostsvc/maintenance_mode_enter
  • Run to restore config
    vim-cmd hostsvc/firmware/restore_config /tmp/configBundle.tgz

Restore Configuration on a blank machine
  • Install Host
    • Install the new host with the same ESXi Version and Build
    • Follow the installation assistent
    • Reboot machine
  • ISO
    • Create a ISO with your backuped configBundle.tgz
    • Burn ISO or Load ISO as Virtual Drive in your LOM
  • ESXi Shell
    • From the Direct Console User Interface, press F2 and Login to access the System Customization menu.
    • Click Troubleshooting Options.
    • Select Enable ESXi Shell and press Return to Enabled.
    • Press Alt+F1 to open the ESXi Shell
  • Mount CD-ROM
    • Load the iso9660 module with
      vmkload_mod iso9660

    • Find the Path to the CD-ROM with
      esxcfg-mpath -l | grep -i cd-rom

    • Set the loaded module to the CD-ROM
      vsish -e set /vmkModules/iso9660/mount <mpx.vmhba33:C0:T0:L0>
    • Now you can see the CD-ROM in the "ls /vmfs/volumes/"
  • Restore config
    • Copy config from mounted CD-ROM Drive to tmp
      cp /vmfs/volumes/<CDROM ISO9660 NAME>/CONFIGBU.TGZ /tmp/configBundle.tgz
    • Run to enter maintenance mode
      vim-cmd hostsvc/maintenance_mode_enter
    • Run to restore config
      vim-cmd hostsvc/firmware/restore_config /tmp/configBundle.tgz

[via]https://graspingtech.com/backup-vmware-esxi-6-5-configuration/[/via]
[via]https://www.techcrumble.net/2017/05/how-to-mount-the-host-cd-rom-to-the-esxi-shell/[/via]
[via]https://kb.vmware.com/s/article/2004746[/via]

Windows 10 1903 – BSOD (WDF_VIOLATION)

After updating an iMac Late 2010 to Windows 10 1903 I got a blue screen "WDF_VIOLATION". After checking the minidump, I could see that the MacHALDriver.sys (Macintosh Hardware Application Layer Driver) is involved. After renaming the file (c:\windows\system32\drivers\MacHALDriver.sys) over the network (works because the system crashes after user login) or in safe mode and rebooting, I was able to log back in. Since I don't use an Apple keyboard I can do without the driver.

While researching I found out that other users also have problems with a similar keyboard driver for HP. In this case it is called HpqKbFiltr.sys. Is also responsible for the hotkeys (screen brightness and co.).

[via]https://forums.overclockers.co.uk/threads/macbook-air-win-10-1903-wdf_violation.18855372/[/via]

TIL: Very useful Linux/Unix commands

Here is a list of useful unix commands or code parts. Who does not know it? You have a problem and looking for a solution where you find at stack overflow or similar pages? Here I collect all the commands that I have encountered over time or whose switch I simply can not remember (or want).

  • How do I find all files containing specific text?
grep -rnw '/path/to/somewhere/' -e 'pattern'
  • How i change the default file permissions (mask that controls file permissions)
umask
  • Untar (unzip) file/folder
tar -zxvf archive.tar.gz
  • Tar (zip) file/folders
tar -cvzf archive.tar.gz file1 file2
  • Copy files via rsync from one host to another
rsync -avz [USER@]HOST:SOURCE [USER@]HOST:DEST
rsync -avz [USER@]HOST:SOURCE rsync://[USER@]HOST[:PORT]/DEST
rsync -avz -e "ssh -p 12345" LOCAL/SOURCE [USER@]HOST:DEST
  • Using rsync with sudo on the destination machine
    1. Find out the path to rsync: which rsync
    2. Edit the /etc/sudoers file: sudo visudo
    3. Add the line <username> ALL=NOPASSWD:<path to rsync>, where username is the login name of the user that rsync will use to log on. That user must be able to use sudo

Then, on the source machine, specify that sudo rsync shall be used:

rsync -avz --rsync-path="sudo rsync" SOURCE [USER@]HOST:DEST
  • Preserve SSH_AUTH_SOCK (Environment Variables) When Using sudo
sudo --preserve-env=SSH_AUTH_SOCK -s
  • nslookup missing? Install dig
sudo apt-get install dnsutils
  • find without "Permission denied"
find / -name 'filename.ext' 2>&1 | grep -v "Permission denied"
  • flush dns cache
sudo systemd-resolve --flush-caches
  • show open ports
netstat -tulpn
  • Directory size
du -sh /var
du -shc /var/*
du -h --max-depth=1 /var
du -sh /var/lib/docker/containers/*/*.log
  • Search multiple PDF files for a "needle"
pdfgrep -i needle haystack*.pdf
  • Show hidden files with ls
ls -lar
  • Redirect STDOUT and STDERR to a file
nice-command > out.txt 2>&1
  • Installs your SSH public key to a remote host
sh-copy-id 'user@remotehost'
  • A command-line system information tool
neofetch
  • Show disk usage, folder size, items per folder, find big directorys, ... with ncdu
ncdu
  • Display Network usage
iftop or iptraf
  • Cleanup Docker
docker system prune --help
  • Find and repair disk errors on ext (ext2, ext3 and ext4) filesystems
sudo e2fsck -f </dev/sda2>